|
|
 |
| HOW TO USE THE COMBINED VOICE EXTRACTOR - REMOVER |
|
|
|
|
|
This tutorial will guide you how to use our
new feature - Combined Voice Remover-Extractor.
Step 1:
Open a song
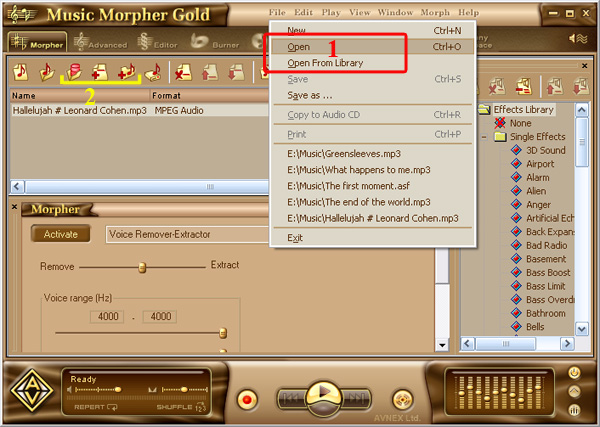
Click on Morpher tab on the module bar to open AV Morpher.
To open a file, click File on the menu bar and choose Open or Open From Library (1). Open dialog box will come up, select an audio file you want to open.
You can also use Open From Library, Add Files to Playlist, Add Folder to Playlist button (2) on the toolbar to add a file to the playlist.

Play the song by clicking the Play button on the Player panel. Remember to turn on the Equalizer to enhance the sound of music. You can adjust all bands to your taste or choose an available preset by clicking the Presets button.
Step
2: Remove or Extract the vocals
Press Active button under the playlist box. Open the list on the right of the button and choose Voice Remover-Extractor. |

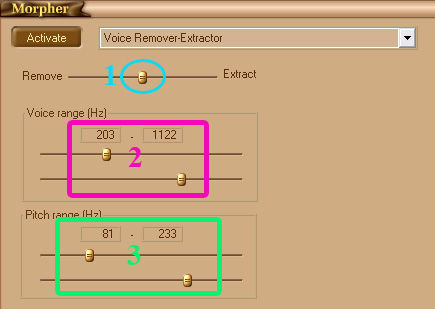
There are 3 main parts you have to concern
| Remove - Extract slider (1) |
This slider is
the main part that will control the Remover - Extractor
Module. It is used for both removing and extracting the
vocals. Left part for voice remover and right one for voice
extractor. If the slider is at the center, as in the
picture, it means nothing is removed or extracted. The
more you move the slider to the left, the more vocals is
remove and vice versa. This is most power full settings that
will influent significantly to the quality of the morphed
sound. |
| |
| Voice range (Hz) (2) |
These 2 sliders
will define the range of the voice which is between 2 slider.
For example, in the picture the voice range is from 203 Hz
to 1122 Hz. All the sound frequency in this range will
be removed or extracted while the other is not. So the wider
range means the more sound is removed or extracted. Try to
turn 2 sliders gradually until you get the best result. |
| |
| Pitch range (Hz) (3) |
Like the sliders
of voice range, the 2 sliders will specify the range of your
voice pitch. It will enhance the removed sound or extracted
voice by making the process more accurately. |
|
Step
3: Morph the song.
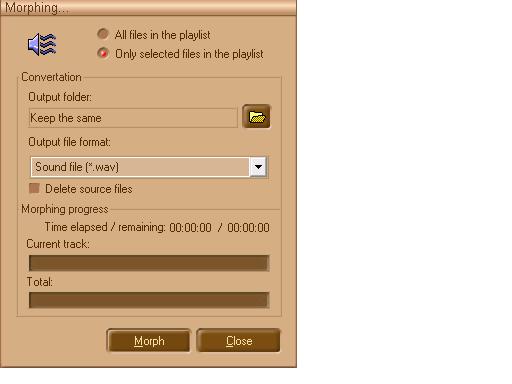
Once everything is OK, press the Morph Selected Files button on the toolbar to morph the song. The Morphing dialog will come up. Define the output folder and the output file format of your song, then press Morph to begin the morphing process.

Note: The quality of removed or extracted files depends on how songs are recorded and mixed. Sometimes vocals are placed in a stereo field in such a way that prevents removal. If songs are recorded in this way, their vocals cannot be removed at all. This is why some vocals can be removed and some cannot. Therefore, users should not expect this software to remove vocals 100% of the time. In most cases, however, it will successfully remove vocals. Sometimes it might sound as if the vocal has not been completely removed; however when the user inserts their own voice, or if the file is then used as a karaoke tune, they will only hear the new voice along with the original music. |
|
| |
|
|
|
